One of the best improvements in Drupal 8 is the new configuration management system. This post explains how things have changed from Drupal 7, and provides a step-by-step walk of Drupal 8 configuration management.
If you’ve spent much time site building or programming in Drupal 7, you probably have worked with the Features module. This module was originally created as a way to package config to easily create reusable functionality on multiple Drupal sites. But it evolved to be used for a much larger task: deploying configuration that is stored in the database between environments for the same site (commonly pushed to a code repository like git).
Our Brick Factory team started using Features for our Drupal 7 builds around four years ago, and it has saved us a bunch of time and headaches. Before Features, we had to remember the configuration changes we made on the dev environment so we could manually re-apply them on the staging and live servers (which is loads of fun!). Features made it very simple to do this and not have to remember all of the config changes.
The Features module did fill a huge need, but it also came with some unique problems:
The configuration management system in Drupal 8 solves a lot of the headaches we encountered with Features in Drupal 7. The learning curve is greatly reduced, the organizational structure for the configuration is already defined and the nebulous “overwritten” status is cleared up. It does take some time playing with it to understand the flow, but our experience is that the learning curve is much less steep than with Features in Drupal 7.
Below I explain how to use the Configuration Management system in Drupal 8. I know it probably seems like a very complicated process, but once you go through it a few times, it should clear up how this system works.
Similar to Features in D7, it is important to understand what is considered configuration and what is considered content in D8. The only thing the configuration management system handles is configuration. Here are a few things that are considered configuration:
Here are a few things that are considered content and are not touched with this system:
Moving content from environment to environment (not config) requires a different module flow (one example would be the Deploy module) and isn’t handled by configuration management.
Hands on learning is really the only way to understand Drupal 8 configuration management. I suggest setting up a new, sandbox D8 site or using a development D8 site locally so that you can experiment without having to worry about breaking anything. Once you have your environment set up work through some common use cases.
Make sure the “Configuration Manager” module is enabled. Clear Drupal cache after you enable the module, which is included with Drupal 8 core.
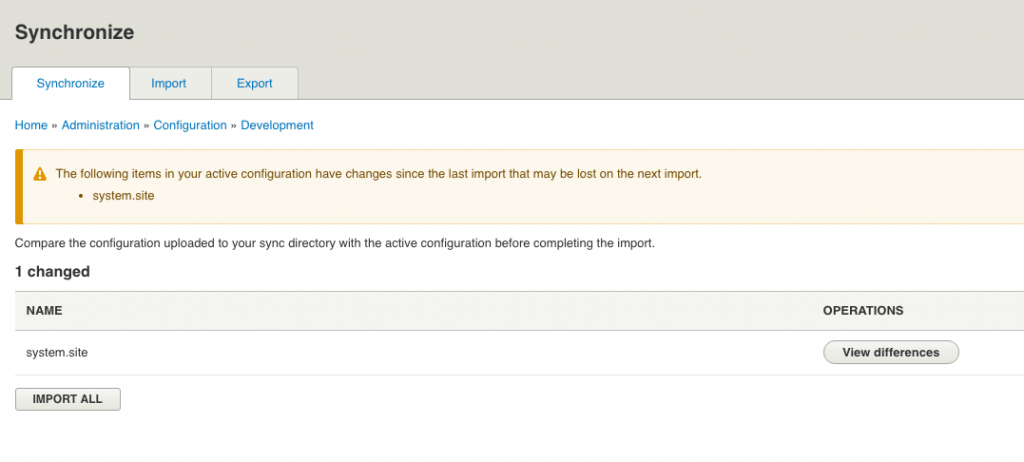
Go to the Synchronize admin page: /admin/config/development/configuration. This is an important area because it not only tells you the config files that have changed between the active configuration (what is in the Drupal db) and what is staged (in the config YAML files), but also allows you to click on each row to view the exact differences. This is extremely useful because if you think the client or another developer might have updated configuration on live, you can see exactly what was done. Even when using Drush for exporting/importing configuration, I still find this area extremely valuable.
Before you can sync configuration between environments, you need to first do a full export of your active configuration. This generates the configuration YAML files in your config_files directory. By default this directory is in your user uploaded directory, but can be changed in your settings file.
There are two ways to export your active configuration to the config YAML files in your sync directory:
Once you do this, the Synchronize admin page should not list any differences between your Active configuration (Drupal db) and the Staging configuration (config YAML files). At this point you can commit the config YAML files to your repository.
Note: You cannot import the configuration files into other Drupal 8 sites with core. It has to be done on the same site. However, it can be the same site on different environments. So if someone sets up a new Drupal 8 site locally where they go through the Drupal installation process…they will not be able to import your site configuration. They will need to download the DB either from a dev environment or your local and start from that DB.
Note: If your hosting provider allows this, I recommend moving your config_files directory outside of your document root.
If you have used Features in Drupal 7, this should be familiar. There are two ways to handle configuration:
This is what you did in Step #2. The idea is that you are taking all of the configuration defined in your Drupal database and converting it to YAML config files. I suggest using the drush cex command to make this simple. You would do this if you update config in your local Drupal website.
Export provides a way to go from the Drupal database to config files. Import does the exact opposite. It imports the configuration from the config YAML files into your Drupal database. To do this you can click on the “Import All” button on the Synchronization page, or use the drush command: drush config-import (or drush cim).
The key element to understanding the concept is that when you drush cex (export), you are having your config files wiped out and match your Drupal database config exactly. When you run drush cim, you are wiping out the configuration in your Drupal database and having it match what is in your config files exactly. This is important because you need to understand when you should run each of these commands. See the How to Avoid Issues section below for a way to easily avoid this problem.
For example, if you apply a config in the Drupal admin, and then run drush cim you are going to wipe out the configuration change you just madein the Drupal admin. If you pull in config file changes from your code repository, apply a change in the Drupal config admin area and then run drush cex you will wipe out the new changes that were pushed to the repository.
The drush based workflow doc page is a good reference for more info.
At this point your active configuration should 100% match your staging configuration. It is time to understand what happens when your Drupal config changes and when your staging config files change.
Let’s make a very basic change in our Drupal db configuration and see what happens.
(1) In the rupal admin area, make a simple config change. For example, go to /admin/config/system/site-information and update the Site Name field.
(2) Go back to the Synchronize admin page and notice what happens:

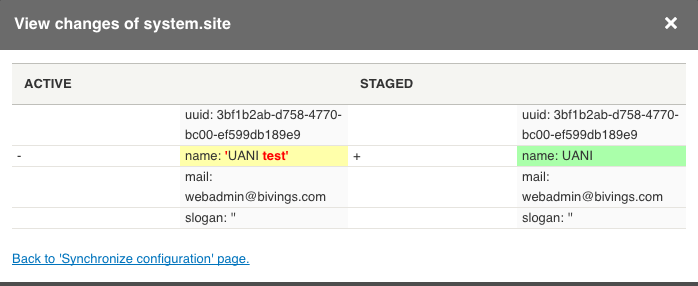
It is telling you your active and staging config do not match. Click on the View Differences button to see what has changed:

(3) On the left it is telling you what was changed in your Drupal DB configuration. On the right it is showing you what is defined in the config files (staged).
(4) At this point seeing what happens when you run drush cex or drush cim is the best way to understand how things work. If you export what is in your active configuration will also be in your staged configuration (which is probably what you want in this case). If you import, the change you just made will get wiped out and it will go back to what is in your configuration files.
Note: This illustrates the idea that if you pull in changed config files and update Drupal config in the admin right after that, you are going to be in a pickle in that you will either have to wipe out the changes in the config files or wipe out the changes you just made in the Drupal config! Later in the article I document a process in avoiding this scenario.
Now we need to see what happens when the config files are changed. This would happen if someone exported new config they made locally and pushed to the repository. In this case you usually want to make sure your Active configuration gets updated with what is in the config files so you don’t wipe out their changes.
(1) Let’s make the same change we did in the Drupal admin, directly to the config files. Now you don’t necessarily have to get comfortable working with the config files directly, but it does help to have a basic understanding in how the YAML works.
(2) Go to your config_files directory and open the system.site.yml file. Change the value under the “name” key to something different.
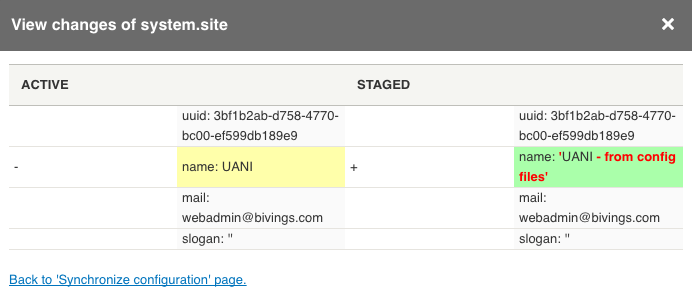
(3) Go to the admin synchronization page and click the View Differences button. It should look like this:

Notice how the change in this case appears in the Staged column? That is because the change was done in the configuration files and not in the Drupal admin area.
(4) To get your active configuration to match what is in the config files, you need to run drush cim. If you run drush cex at this point, it will wipe out what was in the config files.
It may seem confusing, but if you are working on a team where multiple people are working on configuration changes, there is a process you can have everyone follow that minimizes the risk of people wiping out each other configuration changes.
If everyone on your team follows this flow, it should avoid most problems. We’ve had 4-6 people working on the same site, all doing different configuration changes, and it has gone very smoothly!
When there are a bunch of people working and pushing config on a site, sometimes you can find yourself in a situation where running drush cim doesn’t clear up the pending configuration in an environment. I’ve discovered in our cases, regenerating the config from that site usually fixes the problem. This happens with us in staging environments where for some reason certain config sometimes will not revert to what is in the config files after a drush cim. You want to make sure that this is in an environment that is not behind your current dev/staging environments (if it is behind, I suggest grabbing the db from dev/staging instead). Once you pull down the db, run drush cex and take a look at what kind of things change. If content isn’t changing and it is minor configuration tweaks, that usually is fine and you can push that up to the repo and the problem site should reset after another drush cim.
If configuration ends up getting updated on live directly, you should probably grab that db from live and run drush cex before applying updates to the site. One way to prevent config from getting updated on live is to install the Configuration Read-only module. The one complication is that you want to make sure this gets disabled on your local so that site builders and developers can make changes to the configuration. We will probably end up using this across the board as we develop more Drupal 8 sites.
Have you used the Drupal 8 Configuration Management system yet? Did I miss any details in this article that you think we should add? Please let us know! The more we get familiar with this system in Drupal 8, the more we love it and we hope other people discover this functionality as well.
Sign up today to have our latest posts delivered straight to your inbox.